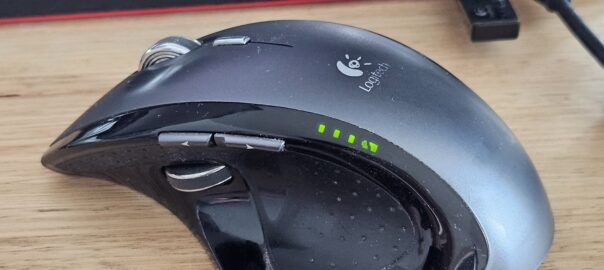
If ever there was a best computer mouse in the world, it’s the Logitech MX Revolution. “Was” because they were discontinued in 2009, with subsequent offerings never quite measuring up to its standard. I had lost the receiver dongle several years ago and have been using a much newer MX Master 2S, until last week, when whilst emptying my laptop bag found the dongle! Happy days! Unfortunately running under Windows 11 has required quite the journey, so am documenting this for the next time I need to re-install.
Installing SetPoint 6.90
Trying to install against Windows 11 R26H2 threw a “side-by-side configuration is incorrect” error message.
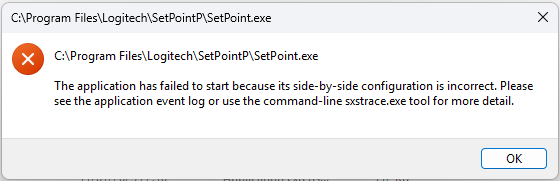
SetPoint was built against older runtimes, so as a prerequisite, install the 2008 and 2010 (x86 and x64) Visual C++ redistributable packages, which as of writing are still available from Microsoft.
Once installed, SetPoint should install normally.
UberOptions Alternative
In order to define the function for it’s many different buttons/actions, Logitech’s SetPoint software is required. The problem was that not all options were available for all buttons. Thankfully a utility called UberOptions unlocked the limitation. The hitch? It only supported SetPoint 4.80, which is no longer available. The latest version, 6.90 is on it’s own, so we need to do come manual hackery.
The first step is to identify the model of mouse you have. Once connected, look in C:\Users\{USER_NAME}\AppData\Roaming\Logitech\SetPoint\user.xml for the mouse model. Something like this:
<code><Device DisplayName="MX Revolution" Class="PointingDevice" Model="<strong>16777338</strong>" NumberOfButtons="13" ConnectionID=""></code>
Now we need to look for the device file for model 16777339. It appears that there were three model numbers for the MX Revolution, so don’t just copy my id. Find the device files in C:\ProgramData\Logishrd\SetPointP\Devices\PointingDevice. In each xml file, look for a heading with your mouse’s hardware ID, exactly like what was in the user.xml file. In my case, the following line was found in For me, it’s in C:\ProgramData\Logishrd\SetPointP\Devices\PointingDevice/100007A/100007A.xml.
<Device DisplayName="MX Revolution" Class="PointingDevice" Model="<strong>16777338</strong>" NumberOfButtons="13" AppTier="2">
Now you want to edit the device file in a text editor, and for any button for which you want to enable more options, update TriggerState node’s HandlerSetGroup to MiceAllGroup.
<TriggerState Name="ButtonDownUp" HandlerSet="LeftClick" HandlerSetGroup="<strong>MiceAllGroup</strong>" />
That’s it. Now exit and restart SetPoint and configure to your heart’s content.
HandlerSetGroup Options
For reference, here’s a list of all possible options for the HandlerSetGroup attribute.
<code>
AdvSmartSearchFreeWheelSardiniaGroup
AdvSmartSearchGroup
AdvSmartSearchMaderiaGroup
AirCenterGestureGroup
ApplicationSwitchGroup
ApplicationSwitchGroup2
AppSwitchFreeWheelGroup
AppSwitchGroup2
BackAirGroup
BackButtonTrackBallGroup
BackFloresGroup
BackGenericGroup
BackGroup
BackGroup2
BackGroup3
CruiseDownControlButtonsGroup
CruiseUpControlButtonsGroup
DocFlip3DZoomGroup
DocFlipZoomGroup
DragLockTrackBallGroup
FaroMiddleGroup
FiveSwitchGroup
ForwardFloresGroup
ForwardGenericGroup
ForwardGroup
ForwardGroup2
ForwardGroup3
FreeWheelBackGroup
FreeWheelForwardGroup
FreeWheelMiddleGroup
FreeWheelMinScrollLeftGroup
FreeWheelScrollLeftGroup
FreeWheelScrollMinRightGroup
FreeWheelScrollRightGroup
FreeWheelZScrollWheelBtnGroup
IkariaMiddleButtonGroup
LeftAirGroup
MediaControlAirGroup
MiceAllGroup
MiceMediaButtonGroup
MiceZoomDownGroup
MiceZoomResetGroup
MiceZoomUpGroup
MiddleButtonAppSwitchButtonsGroup
MiddleButtonDPILevelGroup
MiddleButtonGroup2
MiddleButtonGroup3
MiddleButtonGroup4
MiddleButtonGroup5
MiddleButtonGroup6
MiddleButtonGroupFlores
MiddleButtonJavaGroup
MiddleButtonTiltGenericGroup
MiddleButtonTrackBallGroup
MiddleButtonXposeButtonsGroup
MiddleWheelButtonGroupExtended
NextAirButtonsGroup
OEMAdvSmartSearchFreeWheelGroup
OEMAdvSmartSearchFreeWheelGroupPlaermo
OEMApplicationSwitchGroup
OEMBackGroup
OEMBasicSmartSearchGroup
OEMForwardGroup
OEMFreeWheelBackGroup
OEMFreeWheelBackGroupPlaermo
OEMFreeWheelForwardGroup
OEMFreeWheelForwardGroupPlaermo
OEMFreeWheelMiddleGroup
OEMFreeWheelMiddleGroupPlaermo
OEMFreeWheelMinScrollLeftGroup
OEMFreeWheelMinScrollLeftGroupPlaermo
OEMFreeWheelScrollMinRightGroup
OEMFreeWheelScrollMinRightGroupPlaermo
OEMScrollLeftFaroAndSardiniaGroup
OEMScrollLeftGroup
OEMScrollLeftMediaGroup
OEMScrollLeftMiddleGroupExt
OEMScrollRightFaroAndSardiniaGroup
OEMScrollRightGroup
OEMScrollRightMediaGroup
OEMScrollRightMiddleGroupExt
OEMStandardScrollWheelButtonGroup
OEMStandardZScrollWheelBtnGroup
OEMTiltWheelButtonGroup
PanAndZoomGroup2
PrevAirButtonsGroup
ScrollLeftFaroAndSardiniaGroup
ScrollLeftFaroGroup
ScrollLeftFloresGroup
ScrollLeftGroup
ScrollLeftGroup2
ScrollLeftGroup3
ScrollLeftGroup4
ScrollLeftMiddleGroupExt
ScrollRightFaroAndSardiniaGroup
ScrollRightFaroGroup
ScrollRightFloresGroup
ScrollRightGroup
ScrollRightGroup2
ScrollRightGroup3
ScrollRightGroup4
ScrollRightMiddleGroupExt
SensitivityDownGroup
SensitivityToggleGroup
SensitivityUpGroup
StandardScrollWheelButtonGroup
StandardScrollWheelGenericButtonGroup
StandardScrollWheelGenericButtonGroup2
StandardScrollWheelGenericButtonGroup3
StandardZScrollWheelBtnGroup
ThumbButtonFloresGroup
TiltWheelButtonGroup
TwoSwitchGroup
VolumeAirGroup
ZoomInMaderiaGroup
ZoomoutMaderiaGroup
ZoomXposeButtonsGroup
</code>
Lance
November 2026