
Getting voice digital voice keying (DVC) working between N1MM+ and my TS-590SG has been an elusive target, but after another contest without it, I decided it really was a bullet which needed to be bitten. The post will explain the vagaries of the TS-590SG, and why it’s not as straight forward as perhaps some other radios.
The TS-590’s dual TX audio routes
A point of confusion arises from the TS-590SG’s two independent transmission audio routes. Kenwood calls them voice and data, but that can be misleading; they’re just audio routes. As such, I will refer to them as the front and rear routes respectively.
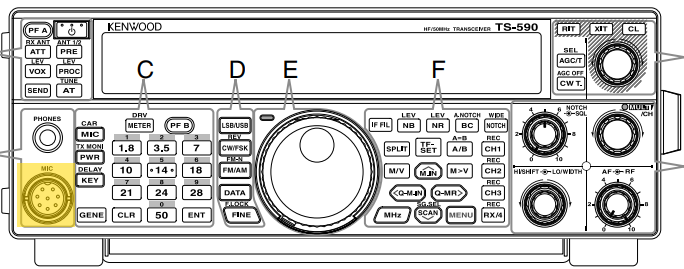
The front route uses audio from the mic connector on the front of the radio, where the hand mic plugs in. Transmission of the front audio may be triggered by any of the following methods:
- The PTT on the hand mic (or otherwise wired up through the front mic connector).
- The [SEND] button on the front panel.
- Enabling VOX via the [VOX] button on the front panel.
- Sending the CAT command “TX;”.
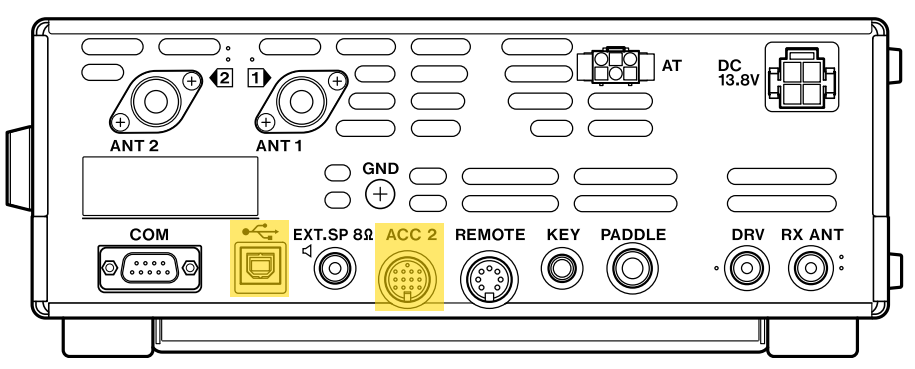
The rear uses audio from either the built-in sound card via the USB input, or the ACC2 input (PIN 11). Both of these inputs are found on the rear of the radio. Transmission of the rear audio may be triggered by any of the following methods:
- Using the ACC2 connector, set PIN9 to LOGIC LOW, or short it to one of the GND pins.
- Assigning the “DATA SEND” function to a programmable function key on the front panel or mic. E.g. setting menu item 94 to “206”, will allow transmission by pressing the [PF 1] key on the radio’s front panel.
- Enabling VOX via menu item 76.
- Sending the CAT command “TX1;”.
There are a couple of points of note:
- When using the rear route, you need to choose between the USB and ACC2 audio sources (i.e. is the audio signal on the USB soundcard, or pin 11 of ACC2). This is done via menu 69.
- Only one audio route can transmit at any one time. E.g., when the front audio route is keyed (transmitted), the rear audio input is muted, and vice versa.
Front or back?
Well, I suspect that if you’re using the front audio route, you won’t be here, as it’s pretty much plug and play with N1MM+. However, because I, and I suspect most people, use the TS-590’s in-built soundcard connected to their computer with a USB cable, the methodology I will discuss here will use the back audio route.
TX keying method?
Let’s consider the options available to us:
- ACC2 connector: This would work, with hardware keying natively supported by N1MM+. However, a small interface would need to be built, and in many cases, another USB to serial adaptor would need to be purchased. The other disadvantage is that there is now another cable between computer and radio.
- Data send PF key: Totally impractical to have to press a button at the start and end of every voice keyed transmission.
- VOX: Whilst this could work, in experimenting I found that it had a tendency to cut off the start of the transmission.
- CAT: Perfect, we can use the existing serial connection which is already set up between N1MM+ and the radio for frequency/mode etc. tracking.
Radio Config
First we need to set some settings on the radio.
| Function | Menu | Set to |
| 69 | Audio input line selection for data communications. | USB If you’re using the ACC2 port, select “ACC2” |
| 76 | VOX operation with data input. | OFF |
N1MM+ Config
I am making the assumption that you already have N1MM+ configured to communicate with your TS-590SG via CAT control.
Disable CAT PTT
The first thing to configure is to disable CAT PTT for the radio. This is because N1MM will send the CAT command to key the front audio route, which is not what we want. From N1MM+’s menu, select Config -> Configure Ports …, then press “Set” alongside your radio’s configuration.
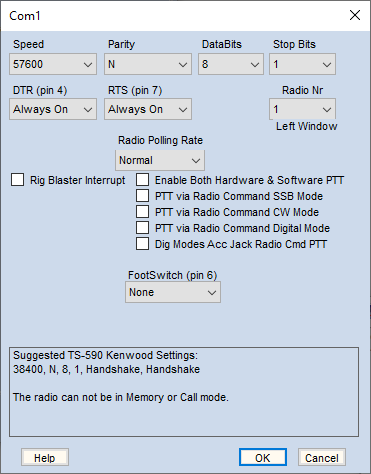
Uncheck the SSB and Digital mode checkboxes, then save.
Audio Setup
Next, we need to ensure that the TS-590SG is selected to have our audio files sent to. Open the audio configuration via N1MM+’s menu, selecting Config -> Logger+ Audio setup, then change to the “Playback” tab.
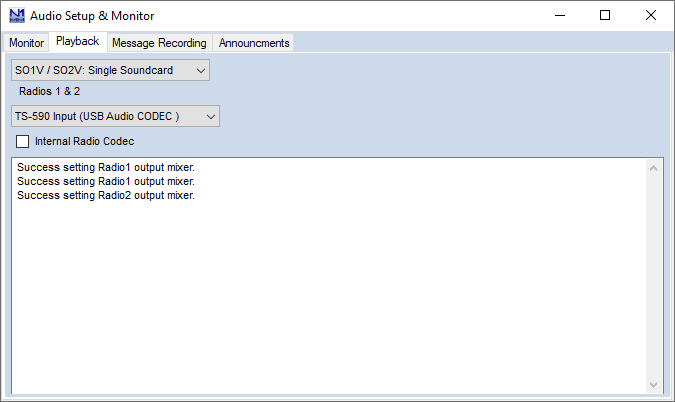
Select “USB Audio CODEC” from the audio device dropdown.
The Internal Radio Codec checkbox does not appear to make any difference, so I leave it unchecked.
Setup the function key file
Open the function key file by right clicking on one of the function keys in N1MM’s input window. By default, your function key file will have lines which look something like:
F1 CQ, {OPERATOR}/Cq.wav
What we need to do is to insert the required CAT commands to switch the radio into TX mode, send the message, then switch to RX mode again. Edit your messages, so that they look like this:
F1 CQ, {CATA1ASC TX1;} {OPERATOR}/Cq.wav {END} {CATA1ASC RX;}
Each element is described below:
- {CATA1ASC …}: The N1MM+ macro which sends subsequent ascii text to radio 1.
- TX1; :The CAT command to tell the TS-590SG to put the rear audio route into TX mode.
- {END}: This macro instructs N1MM+ to wait until the .wav file has completed before executing anything after is.
- RX; : The CAT command to tell the TS-590SG to put all audio routes into RX mode.
Don’t forget that the CAT commands require a trailing semicolon.
Conclusion
And with that, you should now be able to use any of the configured F-Keys to send pre-recorded audio from N1MM+ to your TS-590SG.
Lance
August, 2023