I’ve got a VKLink node that doesn’t get a whole lot of use, so seems a little daft to have a radio on all day just in case. Most of my “radio time” happens in my office, so I always have my computer on. Seeing as the VKLink internals uses Asterisk, I should be able to connect and monitor the node from a SIP client on my phone or computer.

I’ve only got it configured to access via the LAN at the moment, but there’s nothing stopping you accessing the node via the internet too.
This post demonstrates how to set it up for yourself.
To start with, you need to log into your Raspberry Pi, or which ever system you have it running on, and get admin privileges.
sudo su
Asterisk uses the notion of channels. As we’re going to connect to the SIP channel, we need to create an extension (think phone extension) that will connect the caller to the node. To do that we edit the extensions configuration file.
nano /etc/asterisk/extensions.conf
Add the following lines to the end of the file, naturally changing the node number (1730) to your node.
[vklink]

exten => 1730,1,Ringing
exten => 1730,n,Wait(3)
exten => 1730,n,Answer()
exten => 1730,n,SayDigits(1730)
exten => 1730,n,rpt(1730,S)
The magic sauce is the final line, which links the call to the repeater channel. The rest are just to make it appear like a normal phone connection.
After you’ve saved and exited, you still need to create an account to allow a SIP connection to the extension we just created. For that we’re going to edit the SIP configuration file.
nano /etc/asterisk/sip.conf
Add the following lines to the end of the file. Feel free to change the title (bit in brackets), username and password.
[vklink_user]

type=friend
username=vklink_user
secret=pwd_vklink_user
host=dynamic
context=vklink
Note the context line. That needs to match the extension name we created earlier.
That’s got it all configured. Now all we need to do is reload the Asterisk configuration. We do that by starting the Asterisk command line interface (CLI) with the following command:
asterisk -vvvvvr
Node that this command starts the CLI with lots of debugging info, which will make it easier to figure out what’s going on if something is amiss.
Within the CLI, issue the reload command.
raspberrypi*CLI> reload
Great! now we need to configure our SIP client. I’m using the cross platform X-Lite client, but the settings will translate to any other client.
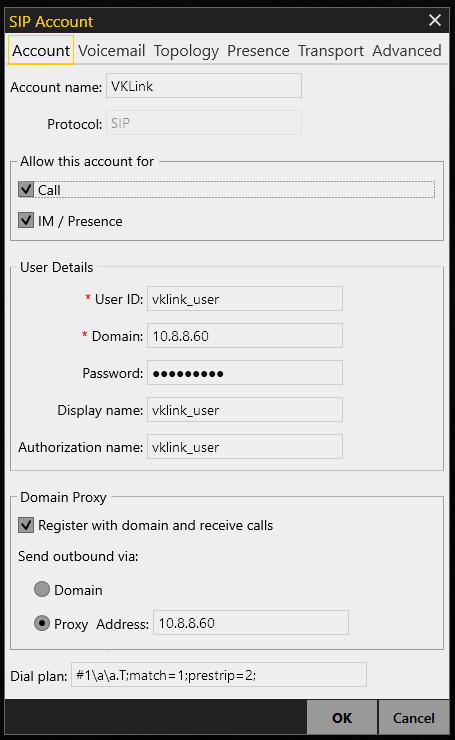
Of particular note are the following fields:
Set to the user name we created on sip.conf:
- User ID
- Display name
- Authorisation name
Set to the password we created in sip.conf:
- Password
Set to the node’s IP address:
- Domain
- Proxy address
That’s it! You should now be able to call your node on the extension you set (1730 in my case) and monitor your node. TXing is handled like a latching PTT button, in this case the * (star) button. Press it to start talking, and again to stop.
Let me know in the comments if I’ve missed out a step and you can’t get it to work.
The one thing that I’ve yet to figure out is why when I TX through SIP, my node number doesn’t go red on the VKLink status page. If you have an idea, I’d be keen to hear it.